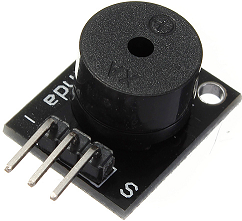
Se puede escuchar el tono del código morse enviado a un Buzzer en el pin 9. 
Se añade al ejemplo anterior para un led la instrucción tone(PIN_BUZZER, NOTA, DURACION),
que requiere PIN_BUZZER, la frecuencia de la NOTA para el sonido y la duración.
El pin de señal S del Buzzer se conecta el Pin 9 del arduino, y se alimenta el VCC (+) y GND(-) completando todo lo necesario para que empiece a sonar el mensaje en el buzzer.
/*  CODificador morse
 *   recibe un mensaje y controla un buzzer en pin 9
 *   equivale: estructura de datos char y string
 *   funciones: codificar y decodificar
 */

// PIN para el LED, led integrado = 13
#define PIN_LED 13
#define PIN_BUZZER 9
#define NOTA 440
//Duración de un símbolo en  ms
#define DURACION 100

void setup(){
  pinMode( PIN_LED, OUTPUT );
  pinMode( PIN_BUZZER, OUTPUT );
  digitalWrite( PIN_LED, LOW );
}

void loop(){
  String mensaje = "SOS   ";
  String mensajemorse;
  char simbolo;
  int n;
  mensajemorse = codifica(mensaje);
  // Transmite el mensaje
  n = mensajemorse.length();
  for(int i=0; i<=n; i++){
    simbolo = mensajemorse[i];
    morseLedTx(simbolo);
  }
}

void morseLedTx(char simbolo){
    if (simbolo == '.'){
      digitalWrite( PIN_LED, HIGH );
      tone(PIN_BUZZER, NOTA, DURACION);
      delay( DURACION );
      digitalWrite( PIN_LED, LOW );
      delay( DURACION );
    }
    if (simbolo == '-'){
      digitalWrite( PIN_LED, HIGH );
      tone(PIN_BUZZER, NOTA, DURACION*3);
      delay( DURACION*3 );
      digitalWrite( PIN_LED, LOW );
      delay( DURACION );
    }
    if (simbolo == ' ') {
      delay( DURACION );
    }
}

// Equivalente letra a código Morse. Estructura de datos
static const struct {const char letra, *codigo;} equivale[] =
{
  { 'A', ".-" }, { 'B', "-..." }, { 'C', "-.-." },
  { 'D', "-.." }, { 'E', "." }, { 'F', "..-." },
  { 'G', "--." }, { 'H', "...." }, { 'I', ".." },
  { 'J', ".---" }, { 'K', "-.-" }, { 'L', ".-.." },
  { 'M', "--" }, { 'N', "-." }, { 'O', "---" },
  { 'P', ".--." }, { 'Q', "--.-" }, { 'R', ".-." },
  { 'S', "..." }, { 'T', "-" }, { 'U', "..-" },
  { 'V', "...-" }, { 'W', ".--" }, { 'X', "-..-" },
  { 'Y', "-.--" }, { 'Z', "--.." },
  { ' ', " " },   //espacio entre palabras
  { '1', ".----" }, { '2', "..---" }, { '3', "...--" },
  { '4', "....-" }, { '5', "....." }, { '6', "-...." },
  { '7', "--..." }, { '8', "---.." }, { '9', "----." },
  { '0', "-----" },
  { '.', ".–.–.–" }, { ',', "--..--" }, { '?', "..--.." },
  { '!', "-.-.--" }, { ':', "---..." }, { ';', "-.-.-." },
  { '(', "-.--." }, { ')', "-.--.-" }, { '"', ".-..-." },
  { '@', ".--.-." }, { '&', ".-..." },
};

String codifica(String mensaje){
  String mensajemorse = "";
  int i, j, n, m;
  bool encontre;
  n = mensaje.length();
  m = (sizeof equivale / sizeof *equivale);
  for( i = 0; i<n; i++ ){
    encontre = 0;
    j=0;
    while(j<m and encontre==0){
      if(toupper(mensaje[i]) == equivale[j].letra){
        mensajemorse += equivale[j].codigo;
        encontre=1;
       }
      j++;
    }
    mensajemorse += " "; //separador de caracteres
  }
  return mensajemorse;
}
Referencia: https://www.arduino.cc/reference/en/language/functions/advanced-io/tone/