
A screw pile is a type of foundation that is used in various construction applications. One of the most popular uses for screw piles is in the construction of decks. Decks are often built on unstable ground, such as sand or loam, and screw piles provide a more stable foundation than traditional deck footings. In this article, we will show you how to build a screw piles deck step-by-step.
Step 1: Choose a location for your deck. The first step in any construction project is choosing the right location. When choosing a location for your deck, there are several things you need to take into account, such as the size of your lot, the layout of your home, and any easements or setbacks that may be in place. Once you have chosen the perfect spot for your deck, it’s time to start planning the design.
Step 2: Plan the design of your deck. The next step is to plan the design of your deck. You need to take into account the size of your lot, the layout of your home, and any easements or setbacks that may be in place. Once you have all of this information, you can start sketching out a rough design for your deck. If you’re not sure where to start, there are plenty of deck design software programs available online that can help you get started.
Step 3: Obtain the necessary permits. Once you have a firm design plan for your deck, you need to obtain the necessary permits from your local municipality. Building a deck without the proper permits can result in hefty fines, so it’s important to make sure everything is above board before breaking ground.
Step 4: Prepare the site for construction. The next step is to prepare the site for construction. This involves clearing away any debris or vegetation that might be in the way, as well as leveling out the ground where your deck will be built. Once the site is prepared, you can start setting the screw piles into place.
Step 5: Set the screw piles into place. Setting the screw piles is relatively simple; all you need is a drill and some concrete mix. First, mark out where each screw pile will go using stakes and string. Then, drill a hole at each mark using a power drill fitted with an auger bit. Next, mix up some concrete and pour it into each hole until it reaches ground level. Finally, insert a screw pile into each hole and tighten it down with a wrench until it is securely in place.
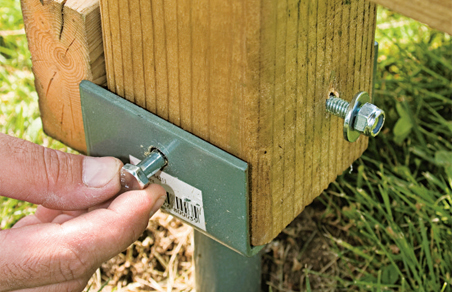
Step 6: Attach the joists to the screw piles. Once all of the screw piles are in place, it’s time to start attaching the joists. Joists are horizontal beams that support the weight of your decking boards and provide structure to your deck overall. To attach joists to screw piles, simply use lag bolts and washers (or other fasteners appropriate for outdoor use). Start by attaching two joists at each end of your deck frame; then work your way down each side until all of the joists are attached.
Step 7: Install the decking boards . The final step in building your screw pile deck is installing the decking boards . Decking boards come in various lengths, widths, and thicknesses; choose whichever size best suits your needs . It’s important to remember that when installing outdoor lumber , you need to use pressure-treated lumber that has been rated for ground contact . This type of lumber has been treated with chemicals that prevent decay and insect damage . To install pressure-treated lumber , simply drive screws through each board and into each joist . Start at one end of your deck and work your way down , making sure each board is properly secured before moving on tothe next one .
Conclusion: Screw piles offer a more stable foundation than traditional footings and are ideal for decks built on unstable ground , such as sand or loam . In this article , we showed you how to build a screw pile deck step – by – step . Follow these steps , and you’ll have a sturdy , durable , long – lastingdeck in no time .